Merry Christmas to everyone!! I wanted to pop in and share a gift that my husband and I made for his mother (yes, my husband actually got a little crafty with me)!! :o)
The photo below was our inspiration. (photo credit: notonthehighstreet.com)
My Mother-in-law saw this and just loved it. Being a crafter, I looked at it and thought easy-peezy, I could whip one up for her in no time. So I purchased a white canvas, white spray paint & white 3D letters that I found in the scrapbooking section of my local craft store. Now, I do have a Cricut so I could have cut them out of chipboard or foam sheets myself, but I was looking to do this as quickly as possible, so I purchased the pre-cut letters.
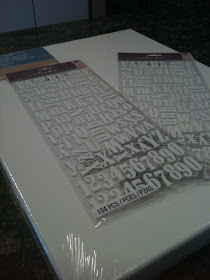
The most time-consuming part of this project was getting the correct layout and spacing that I liked. After that, I just used a little craft glue and glued the letters to the canvas. As you can see, the store ran out of white letters so I had to use black for two of them. It will all get covered with white spray paint, so I wasn't too worried about it.And after several coats of white spray paint, here is the finished product!
Sunday, December 25, 2011
Thursday, December 22, 2011
Hershey Nuggets Candy Dish
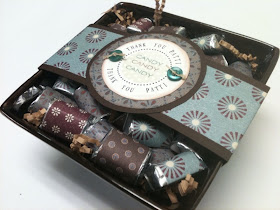
Need a last-minute gift idea? These are perfect gifts for neighbors, co-workers, your postal carrier, or just about anybody!
All you need is a dish, Hershey nuggets, some decorative papers, double-sided tape, ribbon, a few embellishments and you're ready to go!
You wrap each of the chocolate nuggets with the decorative papers, arrange in them in the candy dish, tie a ribbon around everything, embellish it with a gift tag and you're all set.
Wednesday, December 21, 2011
Peppermint Twist Mocha Spa Socks
I had a hard time finding enough brown fuzzy socks to make all the gifts I had in mind, so here's another twist on the cocoa fuzzy sock gifts... a peppermint twist! I also etched this glass mug with a "T" to give it a more personalized touch.
Tuesday, December 13, 2011
Thursday, December 8, 2011
Wednesday, December 7, 2011
Warm and Cozy Fuzzy Socks
Need a quick and easy gift for a friend, teacher, neighbor or coach? Give them something to keep them warm and cozy all winter long...
Saturday, October 1, 2011
Mummy Treats
Sorry I've been away for soooo long...We sold our house, closed, and purchased a new house all within 15 days! And I've spent the past month trying to get unpacked & settled.
Our new street name is quite fitting for this Mummy Treats post. We now live on Ghostley Lane...spooky, right? Because we live in what I call "House on Haunted Hill", we need to step-it-up in the Halloween treats department!
I bought plain 'ole mini Hershey Bars & mini gum packs (5-stick packs) & turned them into boy & girl mummies!A little gauze fabric & some googley eyes and you've got yourself mummy treats!
Wednesday, July 6, 2011
Personalized Tote Bags
Okay, this is a great concept but my technique could use a little work! Personalized tote bags would make a great gift for almost anyone. How cute would these be for your bridal party? You could fill them with flip flops, spa products, magazines or a good book, bottled water & snacks to get them through your big day! Or for a child, you could fill them with a few books and some snacks and they have a little book-nook "kit".
Here's what you need to get started:
Canvas Bag
Paper Doily (10" - 12")
Spray Adhesive
Fabric Paint
Sponge Brush
Vinyl
Cricut
I started by ironing my canvas bag flat. Then using spray adhesive, spray the backside of your paper doily and place it down on the canvas. This will create your "stencil". The adhesive prevents your edges from lifting.
Sponge on the fabric paint and remove the doily. This is what is looks like after:I then used my Cricut and some vinyl to create the "K" stencil. With a little more fabric paint, viola - a personalized tote!
Sunday, June 26, 2011
Wristlets, Key Chains & Fobs
Wristlets, Key Chains and Key Fobs, Oh My! Now these little cuties couldn't be easier to put together and what a nice little gift these make. Here's what you need to get started: Ribbon or decorative fabric; Nylon Webbing (I used both 1" wide & 1.25" wide); Heat n Bond UltraHold; Key Fob Hardware (I purchased mine on Etsy - I used both 1" wide and 1.25" hardware); a Ruler; and a Scissors.
And viola' - an instant gift!
Wednesday, June 22, 2011
Chocolate Nugget Candy Dishes
Chocolate anyone? These candy dishes, filled with custom wrapped chocolate nuggets, are the perfect way to say Thank You or to let someone know that you're thinking about them.
Another version:
Another version:
Wednesday, June 15, 2011
Black & White with a POP of Color!
I am so in love with this technique for editing photos! You can take any full-color photo, turn it into a black & white photograph, and add just a pop of color.
Here is the before photo:
And here it is after being turned into a black & white photo with a small pop of color:
Here is the before photo:
And here it is after being turned into a black & white photo with a small pop of color: